Monday, February 28, 2022

Headrests

As I have previously posted, I ordered a complete interior kit for Alice.  One particular challenge (or challenges, as it were) are the headrests.  Today, I feel I'm winning the battle.

The headrests on the MGB come in a few different varieties.  Mine are the 'D'-shaped headrests.  These are made of an expanding foam covered in soft vinyl.  However, after so many years neither the vinyl nor the foam are quite so soft.

The first job was to remove the old vinyl.  I had hoped to save the foam - and I did!


The old vinyl was hard as a rock.  The foam was sort of squishy, but pretty beefy.  It's the same stuff as what you make seat cushions out of.

The interior kit from Prestige included new headrest covers.  However, it didn't come with any instructions on how to install them (the rest of the kit is very well documented.)  When I inquired, I was advised that the old foam would not compress enough to fit into the new headrest covers, and it would be best to buy new foams.

Nevertheless, I gave it a go after reading a bunch of posts about how this might be doable.  I didn't get very far - and I ended up putting a small tear in one of the new covers.  I stopped before it become a visible issue, but at that point I threw in the towel and searched for headrest foams.

And didn't find any.

I could find the headrests, recovered - but not in the color I needed.  I did eventually find a set in the UK from Mirror Trim... but they have stopped shipping internationally.

I despaired - until I remembered I had friends in the UK!  My friend Tom offered to receive them from Mirror Trim and re-send them to me via international post.  But... the shipping was as much as the foams.  (Welcome to the new reality, I suppose).  I then heard the batch I was ordering from had problems, and was rejected.  Sigh.

But then things went my way - the new batch came in ahead of schedule, and shipping was only a couple of weeks instead of the 6 weeks I was quoted.  They arrived today, and I wasted no time in test-fitting them.

The new foams are very squishy.  I was able to compress them down to 1/4 size by hand.  They fit inside the covers with only a little effort, which is how it should be and exactly as I was advised would be the case.  I test-fit one, and am quite pleased with the result.

Isn't that a pretty color?  And they are soft, like new headrests.

I fit the other one, and they are now both sorting themselves out to get rid of wrinkles and such.  I'll have to remove the old foams from the headrest posts, then glue them into the new foams, before they're complete.  But this is the big win I was looking for that will really make the interior look sharp.

Read more »

Monday, February 21, 2022

Bootalicious

After a couple of weekends of hard work, I've got a fully intact and structurally sound trunk floor.

Having cleaned up the gas filler neck area, I turned my attention to the left side.  I ended up cutting out a large area of rusty metal.

This would have been relatively straightforward to repair, except for one thing:

Braze.

The PO had brazed a patch along the entire left side.  You can't weld to brazed metal.  So I had to cut and grind all of that crap out before I could fit repair panels.  Please, DON'T use braze to fix a car.  It means you have more work to do when it inevitably fails.

But I did get it cleaned up, and the result:

I made those reinforcement strips by hand - I'm rather proud of that work.  I ended up cutting out more metal by the rear valance panel, because I found even more rust hiding under painted caulk.  The result isn't the prettiest, but it is sound and strong and there are no more holes except where they belong.

On to the next problem - the bulkhead panel between the cockpit and the boot.  There appears to be a hole in the fender well, which resulted in water splashing onto and rusting the panel.  So both get to be fixed.  This wasn't too bad, actually - aside from working overhead in a confined area, that is.

First, I cut out the rot.  Thankfully, there's no braze here.

Then, I repaired the gaping hole in the fender well by cutting it out, fabricating a patch and welding it in place.  Again, not the prettiest - but solid.  This will get undercoated to match what's there now.


Then I made a pattern for the patch panel.  I folded the edges over where it contacts the fender well and will seal that with a little caulk (yes, I'll use caulk, but stuff made for this purpose).

Finally, I welded it into place after a dozen rounds or so of test fitting.


This doesn't look half bad, if you ask me.

The result: One repaired boot!


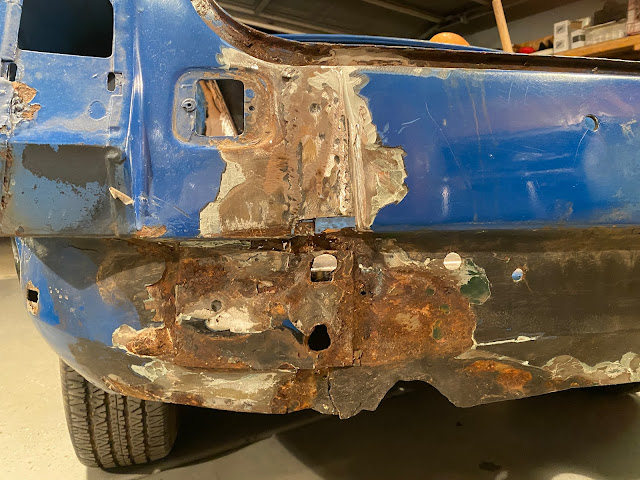
I wish I could breathe a sigh of relief - but I found even more to repair...


I knew there was something here, but I didn't expect it was this bad.  This was buried under up to 1/2" of filler.  The sad thing is that it won't be that difficult to repair properly - but I've complained about that before.  So, that's the next episode - stay tuned!


Read more »

Sunday, February 6, 2022

Welding Progress Update

Update: I made some holes go away and got rid of some ugly stuff.

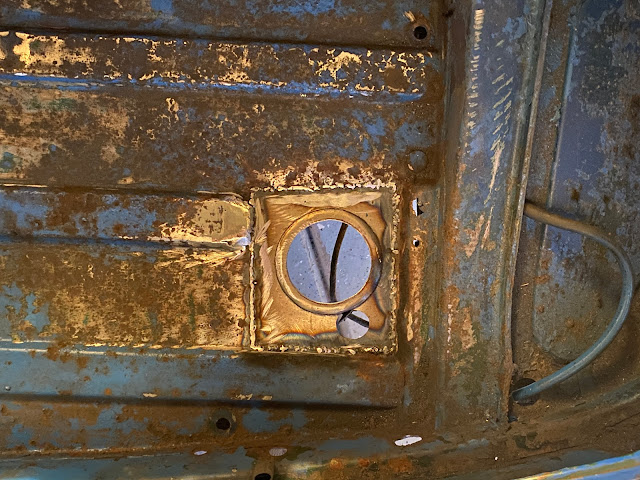
The hole where the filler neck enters the trunk looks better...


Of course, I found a couple of new holes I need to fix.  But those will be easy.  The floor actually has structural integrity again!

I also got rid of that really ugly 'repair' the PO did on the passenger's rear quarter panel.  It took me all of two hours to cut it out, make the repair panel, weld it in and grind it down.  And while it's not perfect, it will take barely a skim coat of filler to even it up.  I am much happier about this repair.

Compared to before, even after a bunch of work on the panel:


Muuuuuuch better.

I'll continue working on the trunk floor to close up two large problems and a couple of smaller ones.  Then I have the rear valance and the driver's side dogleg and sill to fix.  And then I can be done with metal work!


Read more »