Thursday, December 2, 2021

Bring the Heat

The heater doesn't work, which isn't surprising.  Time to dig in while I wait for other stuff to happen.

After sitting for so long, the cables for the heater valve and the air vent are both frozen.  The heater valve works - which is great.  Replacing the cable was trivial, and with a cleaned up control switch it works fine (though actually having heat will have to wait until the car runs again).

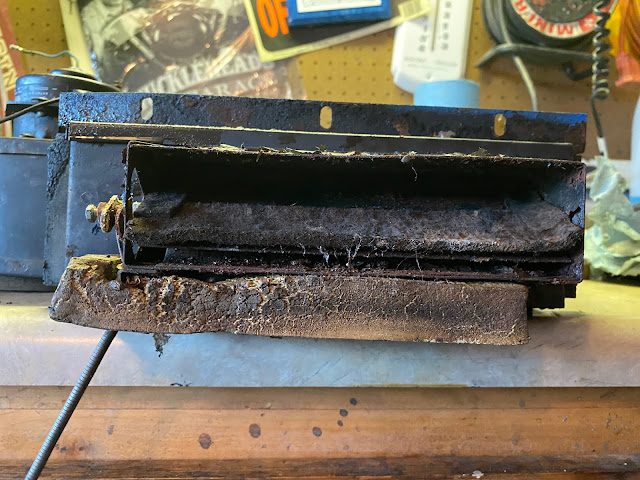
Unfortunately, replacing the cable for the air vent is not trivial.  You have to remove the box as a unit to get to the other end of the cable.  Getting the box out was definitely not fun - I doubt it had ever been removed, as evidenced by the fact it was practically glued in by the gaskets between the body and the box.  Getting the box in and out is a treat in itself - there is a specific maneuver to get the box out, by tipping it up and twisting to the left to get the part that pokes down into the cabin.  But it did come out.

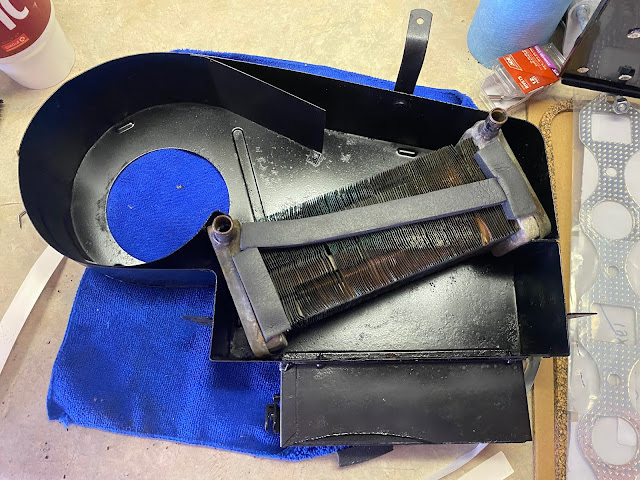
It is clear that there's a reason why the cable didn't move.  It wasn't the cable; it was the box.  Since the MGB has a BIG HOLE in the body that lets air in (and water, too) this is prime to rust to pieces.  Take a look.


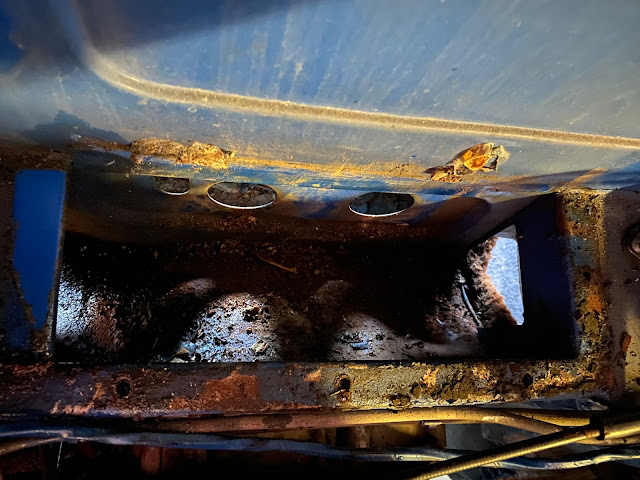
But once again, Our Lady of Disassembly came to my rescue.  The mechanism did work free after some penetrant and a good wire brushing.  All that crappy felt and the body seal turned to dust and goo as I removed it.

The inside isn't much better.

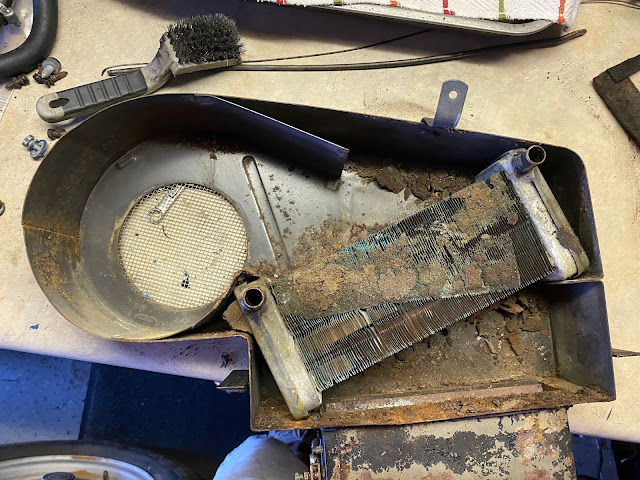
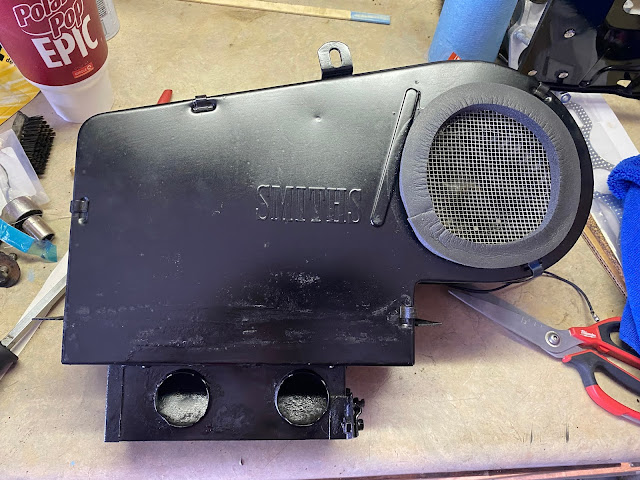
But cleaning makes a world of difference!

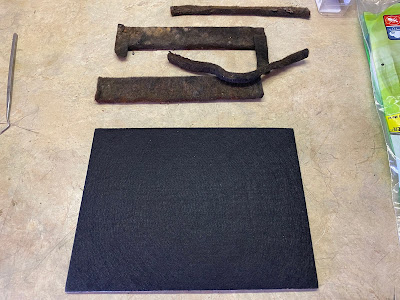
The heater flap cleaned up well with a lick of paint, and some 3/16" felt ($12 on Amazon).  It's got a nice sticky side that should keep it in place for a long time.  And since I don't ever expect this car to see rain again, it should last, well, forever.


Some touchup paint makes the box look good and ready for reinstallation.  It isn't perfect - bit I am not going for a show quality job on this car.  It looks about like it should.  I did not repaint the front of the box, but just did a little touchup.


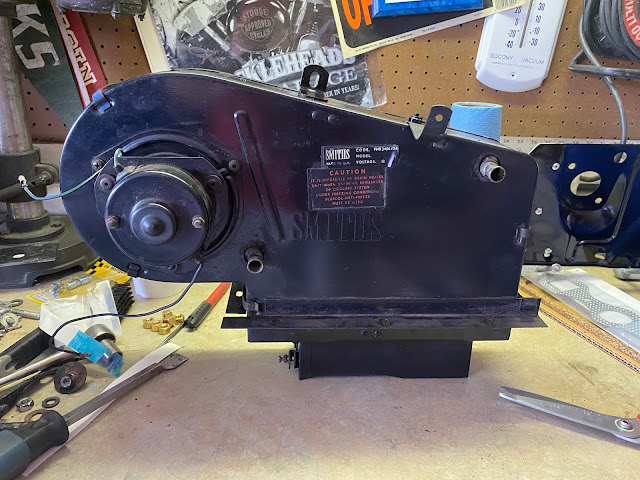
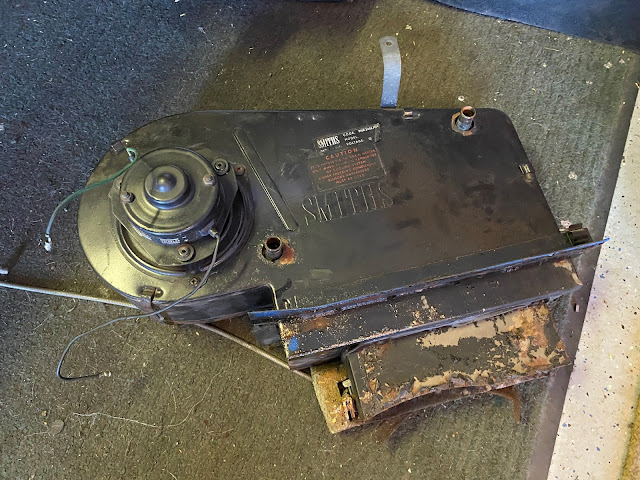
I tested the motor and it's fine.  I didn't disassemble it, because it doesn't come apart easily.  I gave it a squirt of lube just in case.  I installed the cable and it's working great - now, it waits until I paint the car.  (Future episode...)

Read more »

Wednesday, December 1, 2021

Carbs II

I'm back from a break, and I've got carburetors!

In our last episode, I had stripped and cleaned all the parts, and ordered rebuild kits.  Along the way, I also ordered a replacement exhaust (Bell stainless steel) and all the fixings.

So, it was time to reassemble!  It's not difficult.  SU carbs are simple machines.  It was more work to get everything very clean than to actually put it together.  A little precision is needed, especially when fitting the throttle disc (butterfly), but it's kinda hard to get wrong.


The result:


Once built, it was simply a matter of installation.  (Snort.)  I had a good amount of work to do to find all the right matching parts, but I did have them... mostly.  It turns out the 18V engine changed the thread pitch of the manifold studs into the head (why? WHY?) and I had to wait on those.  But my donated manifolds fit perfectly, and the exhaust did too (after a seemingly ridiculous amount of time bolting up the header pipe - so frustrating to be able to touch things, but not get a socket on them).


I have to rebuild the rear (muffler) mounting bracket, as it is a) rusted out and b) was smashed out of the way by whoever installed the decidedly non-stock, not great exhaust that was there.

My only difficulty is one that people with this model year car that do what I am doing face: Note in the last photo, there is not enough clearance to install an air filter on the rear carburetor.  There is a solution (well, two): either install K&N "cone" manifolds which people complain about, or install a cold air intake sold by Moss, which is actually supposed to be pretty good.  But it's $250.  Yeesh.  This car's getting away from me budget-wise.  I'll end up going that route, I suppose, when I place a large order and can get some significant savings.

Regardless, I'm a step closer to mechanical completeness once again, and can't wait to fire Alice back up.  After paint, that is.  (But that's for a future episode.)

Read more »

Wednesday, October 6, 2021

Carbs I

I'm on a quest.  A quest to bring SU carburetion to Alice.  And I'm making progress.

The ZS carb and all the related emissions equipment is definitely a nonstarter for me.  The car runs - but not so well, and there are so many hoses and things that it just doesn't look maintainable.  So I'm going back to a simpler time, where dual SUs roamed the land freely and without fear.

I've got lots of parts.  I have most of four HS4 carburetors, and an intake and exhaust manifold to match.  For me, job 1 is to get those cleaned up, starting with the carbs.

They don't look too good at first glance.  But there's gold in them thar hills.

I have three AUD465s and one AUD405.  I have carb bodies with and without vacuum advance takeoff (I have a mechanical advance distributor, so I don't need it).  I have carb bodies with and without crankcase ventilation.  So I picked the two bodies that appeared to match up how I wanted and two dashpot/pistons that match in configuration and drop rate, and started cleaning.

B-12 Chemtool is my friend.

The result:

I still have some work to make the dashpots look nice, but all the components are clean and ready for assembly.  I now also have a rebuild kit for two carbs waiting for installation, and springs and needles and stuff too.  Fortunately, my car's dash has a blank where the manual choke would go, so my new choke cable will work out fine once I get the linkage I am searching for...

While that's going on, I got after the stuff in the car.  I removed the air pump, air rail, and manifolds.  Again, my luck holds - stuff comes apart on this car pretty easily.

I have much less stuff under the bonnet now... which will be replaced with HS4 goodness.

Next job under there is to remove the old exhaust system, which would have been replaced regardless.  I have a new Bell stainless exhaust on order to match the configuration I'm installing, and it will be glorious.

Next time: some carburetor rebuild action!

Read more »

Monday, September 20, 2021

Braking the Shaft

We had our first "nice" day this weekend - it was only 95 - and it was a perfect day for working in the garage.  So I did.  Yuck.

Not many photos this time - I was too dirty to hold the camera.  But here's a rundown of my productive day:

  • Replaced handbrake cable
  • Rebuilt driveshaft
  • Replaced brake light switch
  • Cleaned heater controls and installed heater cable

First, I replaced the handbrake cable.  This was probably the grossest operation, because it was filthy and... well, that's enough.  The cable was not frozen, but the pivot was (I fixed that a while back).  The PO just loosened the cable so it wouldn't work at all.  I ordered a new cable - so in it went.

But first, the seat came out.

That's the original carpet, folks - look at the fade on that tunnel carpet where the console goes.  It's gonna go, eventually.  I vacuumed all the crud out.

After pulling the seat, I removed the linkage under the car and then removed the lever.  It got a good cleaning, too.

There's a couple of nuts and a clip holding the cable in place, which fortunately are accessed from within the cockpit.  I removed the linkage pins and the retaining bracket, and out it came.  The new one is next to it for comparison.


Reinstallation was not difficult.  I spent more time cleaning stuff under the car.  I lubed the new cable and hooked it up, then reinstalled the handbrake lever.  The tensioner went together easily (being clean), and I adjusted it to 4-5 clicks to hold.


Clean things are nice.

Moving on - since I was under the car, I pulled the driveshaft.  I figured replacing the U-joints would be simple; I've done it a few times before, so piece of cake.  Right?

Wrong.

The front yoke came apart easily enough.  The retaining clips came out, and I was able to knock the cups out.  Putting the new ones back on, though, was a real bear.  I twice had the roller bearings slip and fall into the cup and had to take the cups out, which are a tight fit.  I did get the front yoke done and working smoothly.

The back yoke was a different story.  Being exposed and not covered in crud meant that it was rusted together.  The clips broke when I tried to remove them.  So after struggling and not a few choice words, I got out the cutoff tool and cut the center of the U-joint right out.  I was then able to knock the cups through into the center and remove the remnants of the broken clips.

After cleanup, the U-joint actually went together easily.  The cups were not as tight of a fit (but snug) and things lined up nicely.  After a clean, it went back in the car and all should be well.

Being tired, I decided to tackle an easy job - replacing the brake light switch.  The hardest part of that job was trying to figure out why I had no power to the switch (which was bad, so I felt better about it).  It appears the PO's mechanic did some creative wiring and moved some stuff around at the fuse block.  After sorting that out, I had a working brake light switch - and once installed, working brake lights!

Finally, I installed a new heat control cable.  I cleaned the controls so they move smoothly and hooked it up.  It's hanging there until I reinstall the dash, but it works.

My next jobs:
  1. Remove the heater box and replace the seals and the air diverter cable, which is frozen.  Then I can have heat, or not, and have it come into the car, or not.
  2. Reinstall the (new) dash wiring, test it, and reinstall the dash with instruments.  One nice thing - I can plug all this stuff into the dash before installing it, then just plug in the harness.  Finally, something smart about the engineering on this car.  Once installed, I will reinstall the header controls and have a fully sorted dash.
  3. Rebuild the old set of SU carbs I have once I can piece together two good carbs from four (A friend is bringing me a set - and I traded for manifolds).  Kits are on order.
  4. Pull the air pump, carb and exhaust system, and replace with decent stuff.  Not the air pump, mind you - that goes in a box.
At that point, the car should go and stop again, and I can work on suspension and steering.  This project is a real project, all right!
Read more »

Tuesday, September 14, 2021

Dash-B-Gone

 After a looong pause thanks to weather, I'm back to working on Alice.  This time, it's the dashboard.

Not everything works.  Most things do, but there's some funky behaviors that can only mean one thing- the ghost of Joe Lucas!  I decided the best thing to do was to pull the dashboard and take a look.

Boy, I'm a masochist.

The first thing I did was remove the console and center console.  Those went surprisingly easily - a few screws, some delicate maneuvering, and out they came.  The center console is pretty fragile and will require some reinforcement with glue to keep it intact until I can replace it, if I ever do...

But my fears were not alleviated when I got the consoles out... the PO didn't do me any favors...

Not all of these wires actually go anywhere.

After a little work to remove the dead wiring and a couple of easy patches, it looks much better.

All of these wires go to something.  I hope I can remember what...

On to the dash board itself.  Ugh.  This was held in place by being cobbled together, and not well.  The most difficult part is the nuts under the top of the dash that you need to be Ant-Man to get to, and one of the studs was twisted when the PO (or his mechanic) tried to install the nut and it didn't fit.  I spent two hours in various body configurations trying to get those nuts off... nevertheless, I persisted, and the dash came out after disconnecting and removing the tach and speedo.


It doesn't look so bad from here.  But it's not good.

Here's why I think I have a case of Lucas-itis.


"Well, there's your problem."

So I have a new dash harness on order.

I also pulled the heat and vent controls, and they're functional but gummed up.  At least, they were.  They work great now!  The cables don't, of course - so they're on order too.  Lots of stuff is on order.

I did get the dash dimmer switch unstuck too, but I don't know if it actually works.

Once I get the new harness, I'll test things and if successfully will reinstall the dash (properly). I will also be replacing the radio with something a little more modern, and running the speaker wires properly.  And that will take care of the interior wiring--but there's some more patch work to address under the car, namely for the fuel pump and brake lights, that I have to spend some quality time addressing.  Later.


Read more »

Saturday, July 3, 2021

Brakes Done

I made a quick trip to the Northwest to pick up some parts.

Well, the trip was a vacation… but I stopped by Tom’s Import Toys and picked up my front brake kit. Now that I’m back, they’re ready to be installed.

There’s not a whole lot to do, really. I pulled the hubs off the car (one side at a time). I replaced the wheel bearings because one side was definitely worn. Here’s a handy tip: if you don’t have a press, you can made a drift by grinding down the old outer bearing race enough to slide in without resistance, and use it to install the new race.

After that, it’s as simple as bolting on the new rotor and installing the hub back on the car.


The calipers bolted back in place easily, and new pads and hoses finish off the install.

Bleeding the system from ground zero was interesting. It took a while to pull fluid through the lines (I used a vacuum bleeder).  At one point I was sure I had a blockage. But I did finally get fluid through and then it went fine. I have a reasonably firm pedal and the car stops when I push on it.

So I went for a short drive.


It wasn’t great—something’s making noise in the right rear around corners. I’ll have to investigate. And I’m pretty sure all the tires are out of round, but I know they all have to be replaced. But she does go and stop, and that was my summer goal. I’ll fool with the dash and get the speedo reinstalled, and do a little cleanup to make more things work. Maybe I will work on suspension or steering if I get a cooler day (and buy the parts).  Anyway, whoooo!!!


Read more »

Sunday, June 27, 2021

Brakes III

More parts means wore work. Rear brakes are up!

Other than cleaning years of grime, there’s not too much to it. I started by doing that cleaning. While I would love to make everything perfect, I’m going to get Alice going and work on pretty a bit later.

I installed the cleaned up and lubed adjusters and the slave cylinder. The little clip flummoxed me until I found an old circlip pliers, and was able to spread the clip just enough to fit. One cylinder didn’t have a groove for the circlip!  So I cut one, no problem.


Time for brake shoes and new springs and retainers.


Boy, fitting those springs is a pain. I finally did it all on the workbench, including the parking brake “spreader”, and it went much more easily.

Top it off with a new brake drum and retaining screws, and that’s it.


The other side went faster, aside from having to grind down a lip inside the drum that just barely touched one of the springs. 

I also replaced the brake hose. I don’t think it had ever been done… the lines themselves look okay.

Front brakes are next, as soon as I have parts.  Then I can bleed the system and voila!  Alice will go and stop. 


Read more »